Friday, December 28, 2007

How to Promote your first Windows 2003 Server to become the First Domain Controller of Your Domain

This article will talk about deploying and configuring the first Active Directory Server (Domain Controller) on Hardware Server that runs Microsoft Windows Server 2003 (Standard or Enterprise). In the previous articles we talked about building and preparing your hardware server with Windows Server 2003, and the second article I listed the requirements that you must meet before you start with the installation of Active Directory. Here are the links for the previous articles:


How to Install Windows Server 2003 (Standard or Enterprise Editions) on a New Server

Requirements for Active Directory Installation on the First Domain Controller in your Domain


Now, when your server is ready and the active directory prerequisites have been met, we can start with the Active Directory promotion of your first Domain Controller, here are the steps:
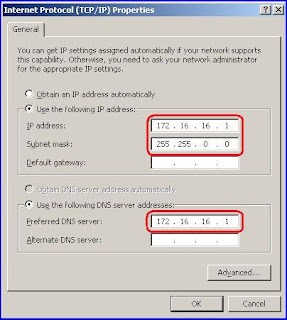
  1. Make sure that this server has a Static IP Address, not Dynamic.
  2. Make Sure that the Drives which will use to host Active Directory Database and Log files are formatted as NTFS Partition and ready to be used.
  3. Logon to the server with an account that has Local Administrator Permission.
  4. From Run command, run the following command: DCPROMO


  5. The Active Directory Installation Wizard will start. Click on Next

  6. On “Operating System Compatibility” Screen, click on Next.


  7. On the “Domain Controller Type” choose first option “Domain Controller for a New Domain”, and then click on Next.


  8. On “Create New Domain” screen, choose First Option “Domain in a new Forest”, and then click on Next.


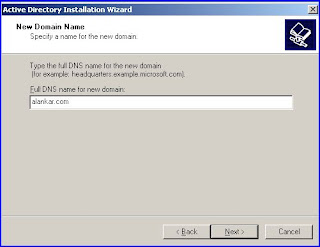
  9. In “New Domain Screen” write the Fully Qualified Domain Name – FQDN of the Active Directory Domain, here I will use “alankar.com” Domain.


  10. In “NetBIOS Domain Name”, accept the Default Name and click next. By default this name will be the first Name Space of your domain, in our example, will be “ALANKAR”, it is recommended to keep this default name and not to change it, but if you want to change it you can.

  11. In “Database and Log Folders” Screen, the default location of AD Database and Logs will be Under Windows Directory hosted in C Drive, but this does not mean that you can’t change it, so if you plan to keep AD Database and Logs on a separate Drive on your server, so click on browse and choose the new location on the new Drive for your AD Database and Logs. But if you are planning not to change the default location of the Database and Logs of your Active Directory, then keep the default location, and then click on Next.


  12. In “Shared System Volume” Screen, also if you are planning to keep your System Volume Files (Group Policy and Scripts) of your Active Directory on a separate Drive then change the location of the SYSVOL Folder location by clicking on Browse tab and choose the new location. If you don’t want to change the default location of this folder, just simply click on Next.


  13. In “DNS Registration Diagnostics” Screen, choose Second Option to allow Windows Install and Configure DNS Services required for Active Directory on the Server. Click on Next.


  14. In “Permission” Screen, As explained in this screen, first option is compatible with pre-Windows 2000 Server Operating Systems (which is Windows NT4.0), but the second option is compatible with only Windows 2000 and 2003 server operating system. So if you are not planning to have NT4.0 Servers under your new domain, then choose second option. Make your decision, and when you finish, Click on Next.


  15. In the “Directory Services Restore Mode Administrator Password”, enter the Restore Mode Password, restore mode option is used only in the Directory Service Restore Mode option used to restore Active Directory. This Password should be easy to remember.


  16. At the Summary Screen, review the settings and options that been selected during the Active Directory Wizard, and if these options and settings are correct, proceed with Active Directory Installation by clicking on Next.

  17. Installation of Active Directory on your new Server will start, and the Server will be the first Domain Controller under ALANKAR.COM Forest/Domain.


  18. During the Active Directory Promotion, the System will prompt you to provide Windows Server 2003 Media CD to copy some files requires for DNS Service. Make sure that you provided the correct Windows Server version for that server.


  19. When Active Directory Wizard finishes the installation and Promotion of your server to Domain Controller, the following screen will appear. Click on Finish.


  20. Click on “Restart Now” to restart the Server
Note: After the server restarted successfully, logon to your Domain (in this case, ALANKAR Domain) and open the Event Viewer of the server and make sure that you don’t see any critical Error Message, and that you can open Active Directory Users and Computers Console where you can see the whole ALANKAR.COM Domain Structure.

Requirements for Active Directory Installation on the First Domain Controller in your Domain

Active Directory installation has certain requirements and prerequisites that you have to meet and fulfill before you start the installation of Active Directory on your First Domain Controller.

These requirements are:


  • NTFS Partition

    You must have at least one partition formatted as NTFS, preferably the partition you used to install Windows on which is C Drive, or if you decided to install Active Directory Database on a drive (Faster Drive) other than C Drive, then this Drive has to be NTFS Formatted Partition. Normally you choose to install or host Active Directory Database on another drive if you are seeking for best performance.

    To convert a partition (C Drive) to NTFS type the following command in the command prompt window:

    Convert c:/fs:ntfs

  • Enough Free Space

    At least 250 MB of free space on the partition you plan to install AD on as minimum recommendation, but Of course you need more than 250 MB if you plan to create more users, groups and various Active Directory Objects.

  • Administrator Account

    Since you are installing the First Domain Controller of your newly prepared server then the logged on user (by default Administrator) needs to have administrative access locally on the server or needs to be member of Local Administrators Group.

  • Operating System

    Active Directory only can be installed on Windows 2000 Server or Windows Server 2003 (all the editions like Standard, Enterprise, and Datacenter). So don’t try to install Active Directory on Windows 2000 Professional or Windows XP or Windows Vista.

  • Supported Network Card - NIC

    In order to start communicating with Active Directory and use the Domain from your client, then your Domain Controller should have Network Card, and your PC as well, I know this is a standard requirements for all new servers, but just in case you forget that so I am reminding you here about the necessity of having Network Card installed and fixed into your server before installing Active Directory on it. From other hand, if you don’t have any Network Card installed or detected by your server, then you will NOT be able to install Active Directory on the server.

  • Dedicated (Fixed) IP Address

    You need a dedicated IP address to install Active Directory. If you do not use a dedicated IP address, DNS registrations may not work and Active Directory functionality may be lost. The Active Directory domain controller should point to itself (its own IP address) in the DNS server list so it will point to itself when registering SRV records and when querying the DNS database.

    To configure your IP configuration, use the following steps:
  1. Right-click My Network Places and then click Properties.

  2. Right-click Local Area Connection and then click Properties.

  3. Click Internet Protocol (TCP/IP), and then click Properties

  4. Under “Use the Following IP Address” section, type in a static IP address, subnet mask, and gateway address (Gateway is optional, based on your network configuration, but this settings will not affect AD installation), Enter the server's IP address in the Preferred DNS server box:
  5. Then click on OK to save the TCP/IP Settings.
  6. Finally click OK to close the Local Area Connection Property Page.
  • Active Network Connection


    Active Directory installation requires an active network connection. When you attempt to use Dcpromo.exe to promote a Windows 2000 Server or Windows Server 2003 - based computer to a domain controller, you may receive the following error message:

    Active Directory Installation Failed
    The operation failed with the following error
    The network location cannot be reached. For further information about network troubleshooting, see Windows Help.

    This problem can occur if the network cable is not plugged into a hub or other network device. To resolve this problem, connect the network cable of the server into a hub or switch. If network connectivity is not available for any reason and this is the first domain controller in a new forest, you can finish the installation of Active Directory on your First Domain Controller by installing Microsoft Loopback Adapter, but using the Loopback Adapter will not allow any communication between this Domain Controller and the rest of the network.

  • DNS Service and Configuration

    Active Directory depends on DNS Server that supports the new zone type (which is the Integrated Zone). By default, when you install Active Directory on the first Domain Controller and you didn’t install and configure the DNS Service on this domain controller, then wizard will detect this issue and will offer you to install and configure DNS Service on this server on behalf of you, so let Active Directory install the DNS Server on the first domain controller and configures the Active Directory Zones for you during the Installation Wizard of Active Directory.

  • A Domain name (FQDN and NetBIOS Names)

    You need to have a Fully Qualified Domain Name for your Active Directory Forest and Domain Infrastructure. If you were planning to have a Single Name Space for your domain, then its NOT recommended at all, you need to have a Fully Qualified Domain Name – FQDN for your domain. For example, a domain called “Domain” is not recommended in AD installation, so, you need to consider to call it “Domain.com” for example.

Saturday, December 8, 2007

How to Install Windows Server 2003 (Standard or Enterprise Edition) on a new Server

Introduction

This article will talk about deploying and installing Microsoft Windows Server 2003 (Standard or Enterprise) on a new Server. This step by step document contains screen shots of the installation process of Windows Operating System which will takes you through the complete process of the installation. The installation steps of the Standard and Enterprise Editions are the same no difference in the installation process of the two versions of Windows Server 2003, the difference is in the features only.


Hardware Requirements for Windows Server 2003

As minimum requirements for Windows Server 2003, An Intel processor–based server running Windows Server 2003 with at least 128 megabytes (MB) of RAM can be used to run Windows Server 2003, but as your organization goes bigger and your users are increased, then you should consider bringing a powerful server with latest Processor Technology (Dual Core) and high processor cache (2MB or 4MB), also with at least 512 MB Memory. Microsoft also recommends that the server should have several gigabytes of disk storage (at Least Two SCSI Disks). In addition, servers should be equipped with high-speed network interface cards (Minimum 100 MBps).

Server Disks and Partitions

The partition in which you are going to deploy the Windows 2003 Operating System should be formatted as NTFS not FAT. By default the main partition (C Drive) will host the Windows Operating System and Files, but if you plan to host this folder and files on another Partition/Disk, then you have to make sure that this drive is formatted as NTFS as well.

Install MS Windows Server 2003 on your Server

If your server was purchased from a known vender, as I mentioned above, like HP, DELL, IBM, etc) then this server will come with a complete kit to prepare your server for Microsoft Various Operating Systems installation, and other operating systems like Linux, Unix, MAC, etc. You have to use this kit to prepare your server with all the configuration and drivers for the operating system that you chose. Here I will not discuss these steps, in order to be familiar with these steps, please consult your hardware vender. In this article, I will list the steps to install Windows Server 2003 directory from the Media you purchased from Microsoft Software Partner.

In order to install Windows Server 2003 on your Server, here are the steps:

  1. To begin the installation procedure, boot directly from the Windows Server 2003 CD. Your CD-ROM must support bootable CDs. (When you configure partitions and format drives, all data on the server hard drive/Disk will be destroyed).

  2. Make sure that you configured your Server BIOS to make the first Boot Drive is the CD/DVD ROM Drive, to be able to boot from the CD/DVD Drive.

  3. During the boot, if you were prompted to “Press Any Key to boot from CD” then press any key, you can press the Enter Key or the Space Bar Key for simplicity, then the Windows Installation Process begins.


  4. On the Welcome to Setup screen, press Enter


  5. Review the License agreement in the next screen and if you agree on all the terms and conditions of this agreement, press F8


  6. The next screen shows the existing disks and partitioned space on your server. Here I used a server with Mirrored 2 x 146 GB Disks, so the available unpartitioned space is 130 GB where I will create two partitions only, first partition which will have 20 GB space as C Partition and second partition which will have the remaining space as E Drive.


    To create the first partition from the above screen, Press C.

  7. In the Size Partition specify the size of the new partition, here in our example I will create a partition of 20 GB or 20000 MB and will be used as C Drive, as appears on the next screen. Click Enter to create the new partition.


  8. You will be returned to the previous screen to see the new created partition, and how much is remaining for unpartitioned space available for the new partitions.
  9. Select the unpartitioned space available to create a new partition (E Drive) with the remaining space available.
  10. Your Disks partitions will appear like this:


  11. Choose C Drive to install Windows Server 2003 on, click Enter.

  12. The next screen will give you options on how you want to format Operating System Partition (C Drive). Choose first option which will format C Drive as NTFS. Click on Enter when you finish the selection.

  13. The Setup will start formatting the Partition based on your selection, which is Quick NTFS Format.


  14. After formatting C Drive, Windows Setup will start copying the setup files to the Windows Installation Folder created locally on the formatted partition (C Drive).


  15. Now, after Setup Process copies the Windows Installation Files locally to the Windows Installation Folder, the server will restart to start the Windows Installation and Configuration Process. Please note that the Server will be restarted Two Times to finish the installation process, this is the first restart, and the second restart will occur after finalizing the configuration of Windows.


  16. During restart of your server you will get the following Windows Server 2003 Startup Screen.


  17. When the server finishes loading the Windows Setup Files, it will start the Windows Installation and Configuration Wizard.


  18. The First Screen after the Windows Installation Wizard is the Regional and Language Settings.


  19. Since we are using an English Version of Windows, then the default language will be English, if you want to install additional support language during setup (like Arabic Language Support) click on “Customized”, then from the tabs choose “Language” tab. Under “supplemental language support” tab click on “Install Files for complex script and right-to-left Languages (Including Thai)”


  20. When you choose to install additional language, you will be prompted for a space confirmation message, click Ok on you have available space for this additional files (only 10 MB or more is required).


  21. After you finish installing the additional language, click on Next from the Regional and Language settings screen.

  22. The next screen will be the Personalize Screen, where you provide information about the Organization that this Windows Server will operate under its network. In this article, this server will operate under my personal organization which is “Al-Ankar Organization”. Click on Next when you finish feeding up the required information.


  23. In the next screen you need to provide the Windows Server 2003 Product Key, this key can be found in the back of the Windows CD Cover or provided by separate Licensing Certificate by the Media and Licensing Provider. Click on Next when you finish from typing in the Product Key.

  24. The Next Screen, In the Licensing Modes dialog box, selects the appropriate licensing mode for your organization, and then click Next. If you are not sure, just keep the default and click on Next.


  25. In the Computer Name and Administrator Password dialog box, type the new computer name in the computer name box, and choose a password for the “Administrator” Local Account, and then click Next.


  26. In the Date and Time Settings dialog box, correct the current date and time if necessary based on your country or region date and time, and then click Next.


  27. Now, Windows will start configuring the server based on the information you provided in the previous screens.


  28. Now, the Windows Setup will start the networking components installation and configuration on the server. The first networking configuration screen will be the TCP/IP Configuration of the Server Network Card. If you know the IP Address that this server will host, then click on custom settings and type in the IP Configuration (IP Address, Subnet Mask, Gateway, Primary DNS, Secondary DNS, etc). if you don’t have such information, then keep the default selection which is “Typical Settings” and click on Next.


  29. The Next Networking Configuration Screen will be “Workgroup or Computer Domain”. Now, if this server is the first Server under your network then you don’t have a domain to join this server to, so keep the default selection which is “Workgroup” and keep the name of this workgroup as the default suggested name which is “Workgroup” and click on next. If you already configured your TCP/IP Settings or you have already Domain under your Network and you have a DHCP Server that leases IP’s to your computers, and you want to join this new server under your existing domain, then you can specify your domain by clicking on “Yes, make this computer a member of the following Domain:” and then specify the domain that you want to join this new server to.


  30. Now, Windows will configuration the Networking components based on your selection on the Networking Configuration screens shown above.


  31. The Windows Setup will start completing configuration and installation of Windows on the Server, and when it will finish, it will restart automatically and takes you to the new installed Windows Server 2003 Logon Screen to start working and browsing the new Server features.


  32. Finally, this the Logon Screen that you will get when you restart the server after it finishes the installation of your Windows Server 2003 Server.


  33. Then you can click on “Ctrl-Alt-Del” on your keyboard, and provide the logon credential specified during the setup, which are:

    User: administrator
    Password: XXXXXXXXX (here I used the following password: P@ssw0rd)

  34. Now, you need to connect this server to the internet and update it with the latest Security Patches and Service Packs.

Conclusion

The above article went through the details steps on how to install Windows Server 2003 on a new server. The coming articles will talk about how to promote this new server to be the First Domain Controller under your production or laboratory network. So stay tuned.

Wednesday, December 5, 2007

New Release for "Microsoft Forefront Security for Exchange Server with Service Pack 1"

Microsoft has release a new version of ForeFront Security for Exchagne (FSE) which supports the new Release of Exchange Server 2007 Service Pack 1. so this new release will work with Exchange Server 2007 SP1 Environment. Also this release supports the new Windows Server 2008 Operatin System which will be released hopefully first Quarter of 2008, as I far i know.

The new release of ForeFront Security for Exchange SP1 (FSE) includes also new enhancments for content filtering and manageability. These enhancements include:

  • Seamless support for organizations running IPv6.
  • Improved content filtering with installable keyword lists that can be used to eliminate email containing profanity in eleven supported languages.
  • Improved integration with Microsoft System Center Operations Manager through new management packs that allow administrators to proactively monitor the state of their Exchange 2007 protection.
  • Increased flexibility for scanning or blocking high compression zip files and RAR archives.

Some tips for Installation and Upgrade to the new ForeFront Security for Exchange Server 2007 SP1:

  • Forefront Security for Exchange users who are running Exchange 2007 RTM and wish to upgrade to Exchange 2007 SP1 must first upgrade to Forefront Security for Exchange SP1.
  • If you upgraded ForeFront Security for Exchange to the new SP1 Release then you must stop all ForeFront services before upgrading Exchange Server 2007 to SP1 "Dont Forget That".

Now go and Download New Release of "Microsoft Forefront Security for Exchange Server with Service Pack 1"

MS Exchange Server 2007 SP1 Help File is availabe for Download

This download contains a standalone version (Offline Copy) of Microsoft Exchange Server 2007 SP1 Help. The Exchange Server 2007 SP1 Help can help you in the day-to-day administration of Exchange. Use this information to guide you through Exchange Server 2007 SP1 features, tasks, and administration procedures
For all Exchange Administrators/Implementors/Consultant who likes to have an offline copy of the Technical Inofrmation about Exchange Server 2007 SP1 which covers everything about Exchange Server 2007 RTM and SP1 Versions they must download this Help File which, I personally consider it, the Guide for all Exchange Administrators / Implementors / Developers / Consultants / Mail Architects / and even Business Makers. this help file contains all the information about the new features as well as a detailed technical information about Exchange Server 2007 Installation / Deployment / Transitioing with Older Exchagne Versions ( 2000 and 2003) / Configuration / Disaster Recover / High Availability / Troubleshooting / Management Shell Command / and Development. in other words, this file is the "MS Exchange Server 2007 from A - to - Z". you will enjoy reading and dealing with this help file, from the way its organized and structured, you will easly find the answer of your questions inside this file.

Saturday, December 1, 2007

Microsoft Exchange Server 2007 Service Pack 1 (SP1) has been released Finally

To everybody who were waiting the Final Release of the First Service Pack of the greatest product ever which is MS Exchange Server 2007 RTM Version, I want to tell them that the waiting time is over :) :) , Microsoft has finally released and published the Service Pack 1 for Exchange 2007 for both 32-Bit Version ( which is used non-production network) and for 64-Bit Version (which is used in the production network).
Exchange Server 2007 SP1 conatains several new features and improvements will extend the Anywhere Access capabilities of Exchange Server 2007 to help make employees more productive on whatever device they’re using, provide additional Operational Efficiency tools for administrators seeking a streamlined management and deployment experience, and enable advanced Built-in Protection for more robust high availability and compliance scenarios.
To download the Service Pack 1 for Exchange Server 2007 for both 32-Bit and 64-Bit , here is the link for the two files
To Download Exchange Server 2007 - SP1 Release Notes, here is the link:
to start using the SP1, I advice you all to deploy it first on your testing environment, either using 32-Bit version before you deploy the 64-Bit on your production server to get familiar with the deployment and installation steps. if your testing environment built on 64-Bit Servers and you have already deployed the 64-Bit RMT version of Exchange on it, then use the 64-Bit version of SP1 on this testing environment also before deploy it on your production network.
Good Luck for your Testing, and take care while deploying it under the Production Network.