How to Install MS Exchange Server 2007 on a new Server under a New Active Directory Domain/Forest - Part II
Prepare Active Directory Domain with Exchange Organization Information
In this step we will prepare Active Directory Domain with Exchange Organization Name and will create Exchange Server 2007 Containers under Active Directory Domain Partition. the New Organization will be created when the update process completed successfully.
To update Active Directory Domain with New Exchange Organization:
- Logon to the server where you will install Exchange Server 2007 with an domain account that is member of "Domain Admins" group. to make sure that you are loggin by the correct user, logon by the Domain Administrator Account "Administrator".
- Put your Exchange Server 2007 Media DVD on the CD Room, and go to Command Prompt screen. go to Run ---> cmd.exe, then click Enter.
- Change the path in the command promt to your Exchange 2007 Media Drive.
- run the following command :
setup.com /PrepareAD /OrganizationName:"Organization Name" or setup.com /p /on:"Organization Name". then click on Enter . - Now the Setup Process will contact your Domain Controller and updates the Domain Partition and Configuration Partition with Exchange Server 2007 New Contrainers and New Orgazation Name will be created as well.

- To verify that this step completed successfully, make sure that there is a new organizational unit (OU) in the root domain called Microsoft Exchange Security Groups. This OU should contain the following new Exchange USGs:
Exchange Organization Administrators
Exchange Recipient Administrators
Exchange View-Only Administrators
Exchange Servers
ExchangeLegacyInterop
as shown below:
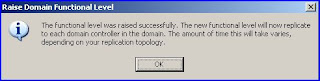
- After the process of Updating Active Directory Domain has been finished, and the Exchange Organization has been created, allow time for replication between all your domain controllers, or you can force the replication between your domain controllers from Active Directory Sites and Services MMC.
Install the First Exchange Server 2007 Server under the new Exchange Organization
Now after we prepared the Active Directory Domain and Forest, we are ready to install the First Exchange Server 2007 with the Three Main Server Roles (Hub Transport Server Role, Client Access Server Role, and Mailbox Server Role).
Before starting with Exchange Server 2007 Installation, make sure that the following Windows Services / Components are installed on the Server (use Add or Remove Programs in Control Panel to add these services):
- World Wide Web Publishing Service (W3SVC): this component is required for Mailbox, Client Access Server Roles.
- Internet Information Services (IIS): this component is required for Mailbox Server Role.
- COM+ access (IIS 6.0 component): this component is required for Mailbox Server Role.
- ASP.NET version 2.0: this component is required for Client Access Server Role.
The following Hotfixes are required by Exchange Server 2007 (Mailbox Server Role):
Note: make sure that your Exchange Server is updated with the latest security patches and hotfixes by running Windows Update on the Exchange Server.
Now, if the above requirements have been met, then you are ready to install your first Exchange Server 2007 under the newly created Exchange Organization. to start the Exchange installation, keep the Exchange Media CD in the Exchange Server CD Drive and follow the below steps:
- now, the following "Auto Launch" screen will appear immediatly upong inserting the Exchagne Media CD in the Server's CD Drive, If the Autorun screen of Exchange didn't appear, you can access it by double-clicking on setup.exe on the Exchange Media CD:
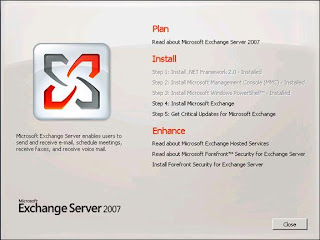
- Now, from the above screen, you can see that the first activated step is step # 4 Install Microsoft Exchange, which means that all Exchange 2007 Software Prerequisits have been installed on that server, if any step (from 1 till 3) was active, then you can't proceed with step # 4 untill you finish all the above 3 steps. he, I installed all the Exchange prerequists for Exchange 2007, and now i can start with Step # 4 - Install Microsoft Exchange. if you recieved the same screen, then go and ahead and start the installation.
- In the Next screen, An Introduction to Exchange Server 2007 appears, click on Next.

Next screen will be the license agreement (EULA). after finishing reading the teams and conditions mentioned within this Agreement (which i doubt you would read it :) ), click on Accept.

Next is the "Error Reporting" Screen. Error reporting will allow your Exchange Server to send error reports to Microsoft in case any problem occurred to your exchange. If you would like to enable error reporting service on your Exchange Server, then select "Yes"; otherwise click "No". then , click "Next".

- In the next screen, "Installation Type" screen, there are two options, the "Typical Exchange Server Installation" and the "Custom Exchange Server Installation" buttons. the default selection is Typical Installation which includes (Hub Transport, Client Access and Mailbox roles, and Management Tools). If you select "Typical Installation" then the three default Server Roles will be selected. to manually select these roles, then click on Custom Installation, from there you can choose any role from the avialable selection. here i will choose the typical installation. To change the default installation path for Exchange, click "Browse" and select a path. By default it will be installed in "[Program Files directory]\Microsoft\Exchange Server". To continue, click "Next".

If "Custom Exchange Server Installation" was selected then the following screen will appear. Click on the checkbox beside each server role name to install the corresponding Exchange Server role. The Mailbox, Client Access, Hub Transport, and Unified Messaging server role can be installed together if on single server. However, please note that each of the Edge Transport Server Role, Active Clustered Mailbox Role, and Passive Clustered Mailbox Role CANNOT be installed with any of the server roles on the same Exchange server. The Management Tools are installed with any selected role, or can be installed independently for an "Admin Only" configuration.
- Next page is "Client Settings" and this page will be presented if the Mailbox role has been selected for installation and if this will be the first Exchange Server in the organization. It is asking if you want public folders enabled for any Outlook 2003 or Entourage clients in your organization. Select "Yes" if you have ealier outlook versions or "No" if you have only 2007 version of outlook, then click "Next" to continue.
After that the "Readiness Check" screen will appear and Exchange Setup will start to check if the server is ready for Exchange 2007 or not by checking all the prerequisits of Exchange 2007 whether they were deployed on the server or not. the check process will be ran against all server roles that been selected during the setup wizard. Please wait for the checks to complete then click "Install" to start the installation. If there are errors, a detailed error message will be given on how to resolve the problem. If there are warnings, please take note and take appropriate action. The same prerequisite may show up more than once across the server roles (such as a required software update), but fixing the problem will satisfy the prerequisite. Note: if you wish to collapse the information area under each role, click once on the double up arrows on the right. To expand the information, click on that arrow (double down arrows) again.


Then the installation of Exchange 2007 on this server will start. The installation progress screen will appear and will be updated as the installation continues to each step. The installation can take a number of minutes to complete while at this stage. After everything is done.

- On the Completion Screen click Finish and the Exchange Management Console will open if the checkbox at the bottom remains checked. After this point, the auto launch screen is again presented and you should continue to "Step 5: Get critical updates for Microsoft Exchange" to get the latest updates


When you click on Finish, the Exchange Management Console will open to start administering your Exchange Environements. in the upcoming articles i will cover you to update your Exchange Server 2007 (Different Type of Installation including Typical, CCR, SCC, and LCR) to Service Pack 1, so stay tuned.