Friday, February 29, 2008

How to Create Mailboxes for Bulk of Users using "Single Command Shell" in Exchange Server 2007

Exchange Management Shell, this powerful and amazing tool that comes along with Microsoft Exchange Server 2007 as one of the Two New Administrative Consoles that you can use to administer the entire Exchange 2007 Organization. I will show you, in this article one of the amazing techniques that you can use with Exchange Management Shell to create mailboxes for users that does not have a mailboxes, using one Single Command. EMS will allow you to locate all non-mailbox-enabled users under your active directory domain and immediately create a mailbox for all these users, and even specify under which mailbox store and storage group you want to host these new mailboxes.

I will show you as well, how to locate users based on command shared attributes between some of users and therefore create a mailbox for these users only, Great right :) So let’s start.

I am using one Domain Controller with Exchange 2007 SP1 Server installed to be able to show you with snaps what I am talking about here. I have created Two OU’s, First OU called “Rangers” my community :) , and second OU called “DotNetBoom” , another community “Enemy” :) just kidding. Now, I created new users under each OU without creating a mailbox for them.

Now, I want to locate or list all the users under my “ProRangers.net” domain that do not have mailboxes. In order to do that from Shell Command, I will be using the “Get-User” Command with a special attributes or Filter called “RecipientType” with a value of “User” to search for only non-mailbox users, here is the command:

Get-User l Where-Object{$_.RecipientType –eq “User”}

The output will be a list of all users that do not have a mailbox:

As you can see from the above screen, the command bring all the users under “prorangers.net” domain that does not have mailbox, even a list of a users that I don’t want to create a mailbox for, like Guest, Support_XXXXXX, krbtgt, IUSR_XXX, etc. Then what to do?


Ok, lets minimize the result by doing a search for a users that are located under a certain OU. Yes, you can do that, I’ve told you its amazing tools :) . Exchange Management Shell can get a list of all non-mailbox users that are located under certain OU by using “-OrganizationUnit” attribute along with “Get-User Command.


Let’s say I want to get a list of all users located under “Rangers” OU that does not have a mailbox, here is the exact command:

Get-User –OrganizationalUnit “Rangers” l Where-Object{$_.RecipientType –eq “User”}

Now, look to the output list:


Now, from the above list, you can see that these are my users that are located under my “Rangers” OU, for which I want to create a mailboxes. Now, lets create amailboxes for all these users under a mailbox store called “ProRangers Store”. I will use the same upper command to first get the list, then use the output of this list and pipeline it with another command to create the mailboxes for these users under the chosen mailbox store, here is the command:

Get-User –OrganizationalUnit “Rangers” l Where-Object{$_.RecipientType –eq “User”} l Enable-Mailbox –Database “ProRangers Store”}


And here is the output:


Using Single Shell Command, I could first locate all non-mailbox-enabled users that located under certain OU (Rangers) and then create a mailbox for them, did you see easier than this before ? I don’t think so :) . Imagine you have hundreds of users , no not hundreds , thousands of users that you want to create mailboxes for them, wouldn’t be easier for you to use such Tool ? I think yes.

Ok, now, lets go beyond this normal search. Lets say that you have single OU , and this OU contains users from multiple departments, and you want to create a mailbox for users from certain department, then my answer to you is “Exchange Command Shell - EMS” offcourse.


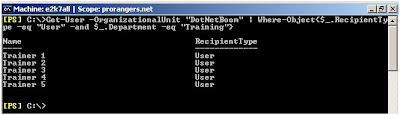
Lets take a look into the following OU called “DotNetBoom” and notice the Departments column for each user, specially the Users under “Training” Department:


Now, lets say I want to create a mailbox for those Trainer users who are working under “Training” Department. So, my command would search for the users under "DotNetBoom" OU who does not have a mailbox AND have “Training” Value under “Department” Attribute, here I combined two filters, first filter was the users without mailboxes, “AND” then the users that have “Training” value under “Department” Attribute. Then the output of this search will be used to “Mail-Enabled” these users, here is the command:


Get-User –OrganizationalUnit “DotNetBoom” l where-object{$_.RecipientType –eq “User” -and $_.Department –eq “Training”}


And this is the output of this command:


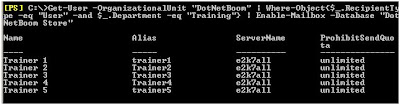
After you found your users or trainers , lets create a mailbox for them, and this time, I will place their mailboxes under another mailbox store called “DotNetBoom Store”, here is the complete command:

Get-User –OrganizationalUnit "DotNetBoom" l where-object{$_.RecipientType –eq “User” -and $_.department –eq “Training”} l Enable-Mailbox –Database “DotNetBoom Store”}

And here is the output :


Lets say you want to find your Trainees now that located under your domain if you don’t know where are your trainees located, but you know that they have a title of “Trainee” under “Title” Attribute of each user. Lets say I have a trainee under “DotNetBoom” and “Rangers” OU’s, and I want to create a mailbox for these trainees, then I would run the following command to find these trainees and create mailboxes for them under a special Mailbox Store created for the Trainees called “Trainee Store”:

Get-User l where-object{$_.RecipientType –eq “User” -and $_.Title –eq “Trainee”} l Enable-Mailbox –Database “Trainee Store”}


and here is the output for my trainee located under my domain “prorangers.net”:


Where, DTrainee X is located under “DotNetBoom” OU and PTrainee X is located under “Rangers” OU.


Ok, the last thing, I have users with mailboxes and users without mailboxes. Now, I want to create a mailbox for the remaining users across the “ProRangers” Domain and regardless their OU Location, but based on the following conditions:

· User does not have mailbox, AND
· Have the word “Community” in their ”Company” Attribute, by using -ilike filter switch.


So, here is the command:

Get-User l where-object{$_.RecipientType –eq “User” -and $_.Company –ilike ‘*Community*’} l Format-Table Name, RecipientType, Company

In the above command, I want the output to show me the name of the user, and the company name that belongs to that user, so I used “Format-Table” Switch. here is the output of the above command, and check the name of the company for each user, it meets the condition of the command, where the company contains the word “Community” and these are non-mailbox-enabled users too:


Fine, lets shoot the command that will create mailbox for these users, and locate them under “ProRangers Store” Mail Store:

Get-User l where-object{$_.RecipientType –eq “User” -and $_.Company –ilike ‘*Community*’} l Enable-Mailbox –Database “ProRangers Store”}

And here is the result,


Now, after we created mailboxes for all usesr using Command Shell, lets see who are the users that don’t have mailbox under “ProRangers” domain, using the first command at the beginning of this article, which is:

Get-User l Where-Object{$_.RecipientType –eq “User”}


And here is the output of this command:


Now, lets get the users who are “UserMailbox” Type of users, I will run the same command, but this time with “UserMailbox” instead of “User” for the RecipientType Filer, here is the command:

Get-User l Where-Object{$_.RecipientType –eq “UserMailbox”}


And the output this time you will figure it out, when you run this command :) Just hint, you the output should list all Mailbox-Enabled users under your Domain.

I hope that this article was somehow interrested to all of you, and you got something new and amazing by using the amazing tools “Exchange Management Shell

The First Rollup Update after Exchange Server 2007 Service Pack 1 is now RELEASED

Yes, Its true :) Microsot Exchange Product Team, has just release the First Rollup Update for Exchange Server 2007 Service Pack 1 Edition. This update is different than the Rollup Update 6 for Exchange Server 2007 RTM (Release To Manufacture) Edition, and can't be used to update the RTM Version of Exchange 2007 even, as Microsoft said.
so,

Note, before you update your Production Exchange SP1 or RTM Version, you have to test the update process on the lab, which is the recommendation always from everybody. so start testing it, and update your production servers to the latest updates and rollups for RTM and SP1 Versions.

Another thing, If you don't upgrade your RTM Version to SP1, then you missed the whole fun :) SP1 has a great features and new technologies as well as the latest rollup updates for SP1 which are 5 (Rollup Update # 6 came after the release of SP1 so its not included in this version of Service Pack, it might be included in the newer release of Service Pack 2, I don't know really :) )

Wednesday, February 20, 2008

How to Upgrade your Exchange 2007 Environment to Exchange Server 2007 Service Pack 1 (Part I: Install SP1 on Typical Exchange 2007 Installation)

The new release of Exchange Server 2007 Service Pack one has a new features and technologies which covers so many areas of Exchange Server 2007 RTM Release which will help to increase productivity and reduce administrative overhead. These new features and technologies were not available in the RTM Release of Exchange 2007. Here are some of these features:


  • Native IPV6 support (Windows Server 2008 & Windows Vista)

  • Public folder configuration from GUI Interface of Exchange Management Console (EMC).

  • POP and IMAP configuration from GUI Interface of Exchange Management Console (EMC).

  • SendAs permission configuration from within EMC.

  • Outlook Web Access Enhancement (Month view, Public Folder Web Access, More languages for spell checking, Personal distribution lists, support for viewing Office 2007 file formats as HTML.

  • Deleted items recovery from OWA, S/MIME in OWA, and more).

  • Delegation wizard scenarios.

  • Delegate management.

  • Folder permission management.

  • Ability to export mailboxes to PST files.

  • New High Availability (Continuous Replication) Technologies (Standby Continuous Replication – SCR).

  • Better integration between OCS and Exchange Server.

  • Manage Clustered Mailbox Server from within Exchange Management Console – EMC.

  • And more new Shell Commands to manage your Exchange Organization from the new Administration Console – Exchange Management Console (EMS).

I will talk in details in my coming articles about these new features and technologies, but now, I will talk about the upgrade process to show you how it’s easy to upgrade your current production exchange server to SP1. This article will show you how to upgrade your production Exchange 2007 Environment in different scenarios (Typical & Clustered Mailbox Server either in Single Copy Cluster – SCC, or Continuous Cluster Replication – CCR) using the Setup Wizard or Command Prompt.


Things to know before you Start the Upgrade Process:


Before you start the upgrade process of Exchange Server 2007 RTM Environment to SP1, here are some important points you need to take into your consideration:


  • If the first upgrade failed for one or more server roles, you must run the upgrade again.

  • If you have multiple Exchange Server 2007 Servers under your Exchange Organization, its recommend that you first upgrade the Client Access servers (CAS). In an organization that has multiple Active Directory sites that use multiple Client Access servers in a proxy situation, you must upgrade the Internet-facing Client Access servers before the Client Access servers that are not Internet-facing, in other words, start the upgrade process from the server that you use to access your mail from outside using Outlook Web Access (OWA).

  • It is not supported to upgrade the operating system that runs on your Exchange 2007 Servers (RTM) Version from Windows Server 2003 to Windows Server 2008.

  • It’s not supported to upgrade the operating system that runs on your Exchange Server 2007 SP1 Version from Windows Server 2003 to Windows Server 2008.

  • To deploy Exchange 2007 SP1 on Windows Server 2008, you must install Windows Server 2008 on a computer that does not have Exchange installed at all, and then install Exchange 2007 SP1 Version. The RTM Version of Exchange 2007 does not support to be installed on Windows Server 2008, you need to use the newer version of Exchange Server 2007 RTM that comes with SP1. Or you can use directly the SP1 binaries to have a fresh installation of Exchange Server 2007 on Windows Server 2008 as well Windows Sever 2003.

  • It’s recommended that you stop and then restart the Remote Registry service on the computer that you want to upgrade its Exchange 2007 Version from RTM to SP1.

  • You cannot use the Setup wizard to upgrade a clustered Mailbox server, you have to use the Command Prompt to do the upgrade.

  • When you upgrade Exchange 2007 RTM server to Exchange 2007 SP1, you upgrade all the server roles that are installed on that server.

  • After you upgrade your Exchange Server to Exchange 2007 SP1, you cannot uninstall the service pack to revert to Exchange 2007 RTM. If you uninstall SP1 then you will remove Exchange 2007 completely from the server.

What permission do you need?

  • If you are upgrading your First Exchange 2007 RTM Server under your Exchange Organization that has Client Access, Hub Transport, Mailbox, or Unified Messaging server role installed then the account you use must be delegated the Exchange Organization Administrators role. The account must also be a member of the local Administrators group on that computer.

  • If you are upgrading your Edge Transport server role to SP1, the account you use must be a member of the local Administrators group on that Edge Server.

  • After you upgraded the First Exchange 2007 RTM Server under your organization to SP1, to upgrade any additional Exchange RTM Servers under the same Exchange Organization to SP1 the account you use must be delegated the Exchange Server Administrators role, cause Exchange SP1 contains AD Schema and Domain Updates, The account must also be a member of the local Administrators group on that computer.

  • To upgrade a computer that has only the Exchange management tools installed, you must log on by using an account that is a member of the local Administrators group on that computer.

  • To upgrade the AD Schema before the actual SP1 upgrade process, then the account you use to upgrade the server must be a member of the Schema Admins group and the Enterprise Admins group.

  • To Prepare Active Directory (AD) for Exchange Server 2007 SP1, the account you use must be member of the Enterprise Admins group.

  • To upgrade your Active Directory Domain, the account you use to upgrade the server must be a member of the Domain Admins group.

  • To update the AD Schema separately before the SP1 upgrade, you need to run the following command from the Command Prompt window on a computer that is in the same domain and Active Directory site as the schema master

    Setup.exe /PrepareSchema or Setup.exe /PS

  • To update Active Directory (AD) separately before the SP1 upgrade, you need to run the following command from the Command Prompt window on a computer that is in the same domain and Active Directory site as the schema master:

    Setup.exe /PrepareAD or Setup.exe /p

  • To update Active Directory Domain separately before the SP1 upgrade, you need to run the following command from the Command Prompt window from your Exchange Server:

    Setup.exe /PrepareDomain or Setup.exe /pd
  • To prepare all domains under your Forest in case you have child and subchild domains, then run the following command

    Setup.exe /PrepareAllDomains or Setup.exe /pad

Exchange Server 2007 SP1 Prerequisites


Exchange 2007 SP1 requires the following updates to be installed on the Exchange Server that you are going to upgrade from RTM Version to SP1 Version ( Off course for the Production you gonna use the 64-Bit Edition, and for the Testing Environment you going to use the 32-Bit, so i am listing both here) :

1. For Production Exchange Environment (running 64-Bit Version):

2. For Testing Exchange Environment (running 32-Bit Version):

Scenario # 1: Install SP1 on Typical Installation of Exchange Server 2007.


We mean by Typical Installation of Exchange when you install the Default Roles of Exchange Server 2007 on single server. The default server roles of Exchange are the non clustered Exchange Roles, which are HUB Transport Role (HUB), Client Access Server Role (CAS), and Mailbox Server Role (MBX). Edge Server is not included in the typical installation since it can’t be installed with any other exchange roles. It has to be installed alone in the DMZ Area and should not be member of your AD domain. So let’s assume that you have one server having these three typical or default roles.


Upgrade your Exchange (Typical) Server 2007 to SP1 using Setup Wizard:


  1. Log on to the server on which you want to install Exchange 2007 SP1.

  2. Insert the Exchange Server 2007 SP1 DVD into the DVD drive.


  3. On the Start page, under Install, click Install Microsoft Exchange Server 2007 SP1.


  4. In the Exchange Server 2007 SP1 Setup wizard, on the Introduction page, click Next.


  5. On the License Agreement page, select I Accept the terms in the license agreement, and then click next.


  6. On the Readiness Checks page, , The current system will be validated and if the current server has any critical issues the setup will not continue, in our case the only warning was about the .Net Framework SP1 that was already installed. Just click on Upgrade to start the upgrade process.


  7. Now, the actual upgrade process will start, here are some screens of the progress and status of the upgrade process:


  8. On the Completion page, click Finish.


  9. To verify the new Release Build number of Exchange Server 2007, open Exchange Management Console – EMC, and click on “Server Configuration”, and note the number under “Version” Column in the middle screen, as shown below:


    The new build number is Version 8.1 (Build 140.6)

  10. to get Exchange Versions and Editions using Command Shell, run the following command:

    Get-ExchangeServer l Format-List Name, Edition, *Version*

    or, for simplicity

    Get-ExchangeServer l fl Name, Edition, *Version*

This command will get you all Exchange Server's Edition (Standard or Enterprise) and the version of exchange Exchange server under your Exchange Organization.

To upgrade your Exchange (Typical) Server 2007 to SP1 using Command Prompt:


  1. Log on to the server on which you want to install Exchange 2007 SP1.


  2. Insert the Exchange Server 2007 SP1 DVD into the DVD drive.


  3. At a command prompt, run the following command.

    setup /mode:upgrade


  4. Now the upgrade process will start from the Command Shell, during the upgrade the progress of each upgrade process will appear within the Command Shell Screen. after the upgarde finishes, you will get the same result shown below:


Conclusion


This is the end of Part I, which shows you the detailed steps on how to upgrade your Typical Exchange 2007 upgrade process from RTM to SP1. The upcoming articles of this series are:


Part II: How to Upgrade a Clustered Mailbox Server in a CCR Environment to Exchange 2007 SP1.


Part III: How to Upgrade a Clustered Mailbox Server in a SCC Environment to Exchange 2007 SP1.

Monday, February 18, 2008

New update for Exchange Server 2007 Help File

I was checking the Exchange Server 2007 Documentation Site, and i noticed that there are a newer update for MS Exchange Server 2007 Help File. the newer update is on 6th of Feb 08, and the size of this file is arround 20 MB.

Download it from the following Link:

Microsoft Exchange Server 2007 Service Pack 1 Help

Monday, February 11, 2008

Windows Server 2008 - Try It

Try out Windows Server 2008 in a virtual environment by following step-by-step guides that walk you through specific scenarios around running applications from anywhere, high availability, server management, and security and policy enforcement.
Don't Miss it, be the First who test The New Windows Server Technology :)