Showing posts with label Exchange 2007 Deployment. Show all posts

Sunday, March 22, 2009

How to Migrate from Exchange 2000/2003 to Exchange 2007 "Transitioning Guidelienes"

The transition process from Exchange 2003 to Exchange 2007 is a relatively straightforward process and involves the following high level tasks:

  1. Prepare the Active Directory directory service, you can extend the Active Directory schema and create the Active Directory objects and universal security groups to support Exchange 2007 before you install the server roles. Run setup.com /PrepareAD from the command line on the domain controller that is the schema master at the forest root. When you run setup.com /PrepareAD, the task setup.com /PrepareLegacyExchangePermissions also runs to create the universal security group that is granted permissions to send e-mail to Exchange 2007 Hub Transport servers.
  2. Supress minor link state updates on all Exchange 2003 front end servers.
  3. Deploy Exchange 2007 CAS/HUB servers in the same organization/forest as the existing Exchange 2003 servers and choose FE_SERVERNAME as the routing group connector destination

    Note: Using an Exchange Server 2003 front-end server together with an Exchange 2007 Mailbox server is not supported.
  4. Configure the routing group connector to use all Hubs servers.
  5. Deploy the Edge servers
  6. Configure the external firewall to allow for outbound SMTP traffic from the Edge servers.
  7. Configure Edge Sync subscription and rest of the Edge settings.
  8. Configure the external firewall 1:1 NAT for both Edge servers to allow for incoming SMTP traffic.
  9. Delete the old SMTP connectors.
  10. Deploy Exchange 2007 mailbox servers
  11. Configure Public folder replication
  12. Configure the CAS web services virtual directories by following the below steps:

    a. Configure CAS OWA virtual directories to support integrated authentication and to set the the external URL

    b. Configure Outlook Anywhere internal/external URLs with Integrated authentication and set the External/Internal URLs

    c. Configure ActiveSync external URL

    d. On the Exchange 2003 backend clusters; configure the ActiveSync virtual directory to use Integrated Authentication

    e. Configure OAB URLs using the Exchange Management Console and configure it to use HTTPS instead of HTTP
  13. Configure rest of the CAS settings
  14. Publish the ActiveSync through ISA 2006
  15. Test co-existence between both servers:

    a. GAL co-existence is automatically achieved since all servers share the same Active Directory information. This means the GAL will appear the same for both Exchange 2007 and 2003 users

    b. Email connectivity between Exchange 2003 to Exchange 2007 servers will automatically be enabled because of the Routing Group Connector created by the installation of the Hub server role
  16. Move sample mailboxes using the Exchange 2007 move mailbox wizard or cmdlet as a test for the migration

    Note: You do not need to move your existing contacts or distribution groups. They will be available in Active Directory even if you remove your Exchange 2003 or Exchange 2000 servers
  17. On an Exchange 2007 server, for each offline address book (OAB), move the generation process to an Exchange 2007 server. For detailed steps, see How to Move the Offline Address Book Generation Process to Another Server.
  18. Upgrade the email address policies
  19. Upgrade the address lists

    Note: Use the LDAP to OPATH converter tool
  20. Change the routing group connectors to use the Exchange 2003 backend server
  21. Decommission Exchange 2003 Front End servers
  22. Move rest of the mailboxes to the Exchange 2007 mailbox cluster

    Note: If you have any Exchange 2003 or Exchange 2000 recipient policies that have not been applied, moving the mailboxes to an Exchange 2007 server will force the recipient policies to be re-evaluated and applied. Before you move mailboxes, make sure that you want to apply all of the existing recipient policies. If you have an existing recipient policy that you do not want to apply, clear the automatically update e-mail address based on e-mail address policy check box in Active Directory Users and Computers. For more information, see the Exchange Server Team Blog article Yes, Exchange 2007 really enforces Email Address Policies.

    Note: The old Exchange 2003 backend will be running for at least 1 week in order to allow Outlook clients to automatically update their profile to point to the new Exchange 2007 mailbox cluster, otherwise, if the cluster is decommissioned immediately, clients will not be able to access their mailboxes until their profiles are modified to use the new Exchange mailbox server. KOC must ensure that all Outlook clients will logon at least once during this week for their profiles to be updated. Clients that do not logon before the old cluster is decommissioned must be updated manually. Exprofile can be configured to run as a logon script for the MAPI users to automatically configure their Outlook profiles to use the new mailbox server.
  23. Remove the Exchange 2003 backend servers. The decommissioning of the Backend servers should be conducted after making sure that all clients are redirected to the Exchange 2007 servers
  24. Remove the last Exchange 2003 server from the organization. For detailed steps, see http://technet.microsoft.com/en-us/library/bb288905(EXCHG.80).aspx
    Note that these are just a guidelines to help in your migration planning, i'm not covering all of the scenarios and situations which will vary according to the environment design & setup.

I hope the above steps will be useful to the readers, as the above steps i always use in my deployments for customers.

Saturday, January 5, 2008

How to Install MS Exchange Server 2007 on a new Server under a New Active Directory Domain/Forest - Part II

This is Part II of the Article Series of "How to Install MS Exchange Server 2007 on a new Server under a New Active Directory Domain/Forest". In this article we will start with Updating Active Directory Domain with Exchange Organization Information.

Prepare Active Directory Domain with Exchange Organization Information

In this step we will prepare Active Directory Domain with Exchange Organization Name and will create Exchange Server 2007 Containers under Active Directory Domain Partition. the New Organization will be created when the update process completed successfully.

To update Active Directory Domain with New Exchange Organization:
  1. Logon to the server where you will install Exchange Server 2007 with an domain account that is member of "Domain Admins" group. to make sure that you are loggin by the correct user, logon by the Domain Administrator Account "Administrator".
  2. Put your Exchange Server 2007 Media DVD on the CD Room, and go to Command Prompt screen. go to Run ---> cmd.exe, then click Enter.

  3. Change the path in the command promt to your Exchange 2007 Media Drive.
  4. run the following command :
    setup.com /PrepareAD /OrganizationName:"Organization Name" or setup.com /p /on:"Organization Name". then click on Enter .

  5. Now the Setup Process will contact your Domain Controller and updates the Domain Partition and Configuration Partition with Exchange Server 2007 New Contrainers and New Orgazation Name will be created as well.


  6. To verify that this step completed successfully, make sure that there is a new organizational unit (OU) in the root domain called Microsoft Exchange Security Groups. This OU should contain the following new Exchange USGs:

    Exchange Organization Administrators
    Exchange Recipient Administrators
    Exchange View-Only Administrators
    Exchange Servers
    ExchangeLegacyInterop

    as shown below:


  7. After the process of Updating Active Directory Domain has been finished, and the Exchange Organization has been created, allow time for replication between all your domain controllers, or you can force the replication between your domain controllers from Active Directory Sites and Services MMC.

Install the First Exchange Server 2007 Server under the new Exchange Organization

Now after we prepared the Active Directory Domain and Forest, we are ready to install the First Exchange Server 2007 with the Three Main Server Roles (Hub Transport Server Role, Client Access Server Role, and Mailbox Server Role).

Before starting with Exchange Server 2007 Installation, make sure that the following Windows Services / Components are installed on the Server (use Add or Remove Programs in Control Panel to add these services):


  • World Wide Web Publishing Service (W3SVC): this component is required for Mailbox, Client Access Server Roles.
  • Internet Information Services (IIS): this component is required for Mailbox Server Role.
  • COM+ access (IIS 6.0 component): this component is required for Mailbox Server Role.
  • ASP.NET version 2.0: this component is required for Client Access Server Role.

The following Hotfixes are required by Exchange Server 2007 (Mailbox Server Role):

Note: make sure that your Exchange Server is updated with the latest security patches and hotfixes by running Windows Update on the Exchange Server.

Now, if the above requirements have been met, then you are ready to install your first Exchange Server 2007 under the newly created Exchange Organization. to start the Exchange installation, keep the Exchange Media CD in the Exchange Server CD Drive and follow the below steps:

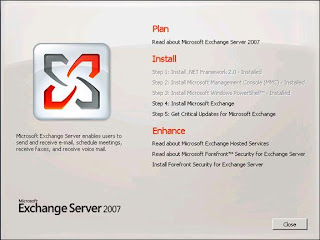
  • now, the following "Auto Launch" screen will appear immediatly upong inserting the Exchagne Media CD in the Server's CD Drive, If the Autorun screen of Exchange didn't appear, you can access it by double-clicking on setup.exe on the Exchange Media CD:
  • Now, from the above screen, you can see that the first activated step is step # 4 Install Microsoft Exchange, which means that all Exchange 2007 Software Prerequisits have been installed on that server, if any step (from 1 till 3) was active, then you can't proceed with step # 4 untill you finish all the above 3 steps. he, I installed all the Exchange prerequists for Exchange 2007, and now i can start with Step # 4 - Install Microsoft Exchange. if you recieved the same screen, then go and ahead and start the installation.
  • In the Next screen, An Introduction to Exchange Server 2007 appears, click on Next.

  • Next screen will be the license agreement (EULA). after finishing reading the teams and conditions mentioned within this Agreement (which i doubt you would read it :) ), click on Accept.


  • Next is the "Error Reporting" Screen. Error reporting will allow your Exchange Server to send error reports to Microsoft in case any problem occurred to your exchange. If you would like to enable error reporting service on your Exchange Server, then select "Yes"; otherwise click "No". then , click "Next".


  • In the next screen, "Installation Type" screen, there are two options, the "Typical Exchange Server Installation" and the "Custom Exchange Server Installation" buttons. the default selection is Typical Installation which includes (Hub Transport, Client Access and Mailbox roles, and Management Tools). If you select "Typical Installation" then the three default Server Roles will be selected. to manually select these roles, then click on Custom Installation, from there you can choose any role from the avialable selection. here i will choose the typical installation. To change the default installation path for Exchange, click "Browse" and select a path. By default it will be installed in "[Program Files directory]\Microsoft\Exchange Server". To continue, click "Next".


    If "Custom Exchange Server Installation" was selected then the following screen will appear. Click on the checkbox beside each server role name to install the corresponding Exchange Server role. The Mailbox, Client Access, Hub Transport, and Unified Messaging server role can be installed together if on single server. However, please note that each of the Edge Transport Server Role, Active Clustered Mailbox Role, and Passive Clustered Mailbox Role CANNOT be installed with any of the server roles on the same Exchange server. The Management Tools are installed with any selected role, or can be installed independently for an "Admin Only" configuration.


  • Next page is "Client Settings" and this page will be presented if the Mailbox role has been selected for installation and if this will be the first Exchange Server in the organization. It is asking if you want public folders enabled for any Outlook 2003 or Entourage clients in your organization. Select "Yes" if you have ealier outlook versions or "No" if you have only 2007 version of outlook, then click "Next" to continue.


  • After that the "Readiness Check" screen will appear and Exchange Setup will start to check if the server is ready for Exchange 2007 or not by checking all the prerequisits of Exchange 2007 whether they were deployed on the server or not. the check process will be ran against all server roles that been selected during the setup wizard. Please wait for the checks to complete then click "Install" to start the installation. If there are errors, a detailed error message will be given on how to resolve the problem. If there are warnings, please take note and take appropriate action. The same prerequisite may show up more than once across the server roles (such as a required software update), but fixing the problem will satisfy the prerequisite. Note: if you wish to collapse the information area under each role, click once on the double up arrows on the right. To expand the information, click on that arrow (double down arrows) again.


  • Then the installation of Exchange 2007 on this server will start. The installation progress screen will appear and will be updated as the installation continues to each step. The installation can take a number of minutes to complete while at this stage. After everything is done.

  • On the Completion Screen click Finish and the Exchange Management Console will open if the checkbox at the bottom remains checked. After this point, the auto launch screen is again presented and you should continue to "Step 5: Get critical updates for Microsoft Exchange" to get the latest updates

When you click on Finish, the Exchange Management Console will open to start administering your Exchange Environements. in the upcoming articles i will cover you to update your Exchange Server 2007 (Different Type of Installation including Typical, CCR, SCC, and LCR) to Service Pack 1, so stay tuned.

Tuesday, January 1, 2008

How to Install MS Exchange Server 2007 on a new Server under a New Active Directory Domain/Forest - Part I

Now after I covered the installation of Windows Server 2003 on a new server and promiting this new server to the first Domain Controller of a new Active Directory Forest/Domain, now its the time to install Exchange Server 2007 on a new server.

In this Article, I will talk about the actual deployment steps and procedures that you will use to install a new Exchange Server 2007 server with the Three Main Server Roles "Hub Transport Server, Client Access Server and Mailbox Server Roles" on a single server using the GUI installation tools. I will show you how to Prepare your Active Directory for Exchage Server 2007 Installation, and how to check the pre-requisites using a prerequisites scanner engine built into the Exchange 2007 installation program. Now I will start in Preparing the Active Directory Environment in order to host Exchange Organization.


How to Raise your Windows 2003 - Domain Functional Level to "Windows 2000 Mode"

As part of the Infrastructure Requirements for Exchange Server 2007, the Domain Functional Level for your Active Directroy has to be in "Windows 2000 Native Mode" or higher, so first you have to raise your Windows 2003 Domain Level to Windows 2000 Native Mode.

To raise the Domain Functional Level to Windows 2000 follow these steps:

Note: This is a one way process, it can't be changed back, so DO NOT raise the domain functional level if you have, or will have, any Windows NT 4.0 or earlier domain controllers. As soon as the domain functional level is raised to Windows 2000 native or Windows Server 2003, it cannot be changed back to a Windows 2000 mixed domain.

  1. Log on to your Domain Controller with domain administrator credentials.
  2. Click Start, point to Administrative Tools, and then click Active Directory Users and Computers.
  3. In the console tree, right-click the domain that appears under Active Directory Users and Computers (in my example it would be "alankar.com" , and then click Raise Domain Functional Level.

  4. Under Select an available domain functional level, Click "Windows 2000 native", and then click Raise to raise the domain functional level to Windows 2000 native.

  5. Read the "Warning" message that appears after you click the "Raise" button. it says that this process cannot be changed after you confirm this message. So you have to be careful in your decision. If you don't have and will never have Windows NT4.0 Domain Controllers (PDC or BDC) under this domain, then click Ok, but if you are planning to have NT4.0 PDC or BDC under this domain, then DO NOT proceed in this process. now, i assume that you are sure that you will never have NT4.0 under your domain, so click OK.


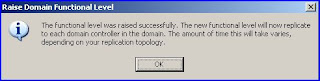
  6. Afer your domain was raised successfully to Windows 2000 Native Mode, you will get the following confirmation message box for the successful raise of your domain, click OK.


  7. After the successful Raise of your Domain, you will see the immediate affect of this raise on the same box shown in Step # 4. Check the Domain Level under "Current Domain Functional Level" it should show "Windows 2000 Native" as shown below:


Prepare Active Directory Schema for Exchange 2007 Attributes and Classis


Now, after the Domain Level has been raised successfully to Windows 2000 Native Mode, we can proceed with the next step of Exchange 2007 Installation which is "Updating the Active Directory schema with Exchange 2007 Attributes and Classes. this process is the same process we used to do with Exchange Server 2003 installation, if you remember, that we used to run Exchange 2003 Setup with "/ForestPrep" switch against the Active Directory Schema to extend the schema with Exchange Server 2003 Attributes and Classis, with Exchange 2007, still its the same process, but with different Switches. here are the steps to Extend Active Directory Schema for Exchange 2007 Attributes and Classis:

  1. Logon to the server where you will install Exchange Server 2007 with an domain account that is member of "Schema Admins" group. to make sure that you are loggin by the correct user, then logon by the Domain Administrator Account "Administrator".
  2. Put your Exchange Server 2007 Media DVD on the CD Room, and go to Command Prompt screen. go to Run ---> cmd.exe, then click Enter.
  3. Change the path in the command promt to your Exchange 2007 Media Drive.
  4. run the following command : setup.com /PrepareSchema or setup.com /PS


  5. after you click on Enter, the Exchange Setup will connect to your Domain Controller that host the Schema Master Role and updates or extend the AD Schema with Exchange Attributes.


  6. Make sure that the /PrepareSchema Commands Completed successfully.
  7. Allow time for replication to allow the Schema Master DC replicates the changes to all DC's under your domain, offcourse the time depends on how many Domain Controllers under your Domain/Forest, the number of DC's you have, and the connectin speed between all the DC's.

Now, Part 1 of this article has finished, i will continue in the coming parts of this serries , so stay tuned.

Sunday, July 22, 2007

Issue while configuring CCR with FSW (File Share Witness)

I want to share with you one of the issues that I found during Exchange Server 2007 – CCR Implementation. The issue appears while trying to configure FSW (File Share Witness) for the CCR, I don’t know if anyone faced this issue or problem before during his testing of CCR , but in case you didn’t , and you faced the same issue, I am sharing the solution of this issue with you in order to get over and solve this issue.

What is FSW ?


CCR uses the new File Share Witness feature introduced in an update to the Windows 2003 SP1 to act as the witness node instead of implementing a third node in the cluster for that purpose. Microsoft always recommends to install the FSW on one of the Hub servers. Also in site resilience implementation MS recommend to pre-provision another FSW on the Hub server that is hosted in the backup site and to be used to speed up the process of bringing up the backup site in case of disasters, and in order to facilitate such process of bringing up the other FSW and as a best practices MS recommend to use a CNAME record that is pointing to the server hosting the FSW so in case of disasters you just need to change the CNAME record to point to the other server hosting the standby FSW, easy task. so in general you will create the CNAME record in the DNS that will be pointing to the FSW server, and the issue is in this procedure.


So where is the problem???


sometimes when you try to use the CNAME record to populate the FSW or even to test the access to the FSW share using the CNAME you will got this error:

\\CName_Of_FSW

”You were not connected because a duplicate name exists on the network. Go to System in Control Panel to change the computer name and try again”


For example, if you deployed FSW on a HUB Server called (SRV-E2K7HUP-01) and you added a CNAME Record under the Active Directory called FSW, and you tried to access this CNAME from any of the CCR Nodes under this network, by running file://fsw/ from Rum Command, you will get the above mentioned error, and you will not be able to proceed, cause you need to configure Windows Cluster for the Two CCR Nodes with file://fsw.domain/MNS_FileShare_Name. and both CCR nodes needs to access this shared folder.

The Solution:


To solve this problem you have to disable the Strict Name Checking, from the Registry of the server that hosts the FSW (which is in our case the HUP Server SRV-E2K7HUP-01):


  • Start Registry Editor (Regedt32.exe).

  • Locate and click the following key in the registry: HKEY_LOCAL_MACHINE\System\CurrentControlSet\Services\LanmanServer\Parameters.

  • On the Edit menu, click Add Value, and then add the following registry value:

    Value name: DisableStrictNameChecking
    Data type: REG_DWORD
    Radix: DecimalValue: 1


  • You have to restart the server after that.

  • After Restarting the server make sure that you can access the C-Name of the FSW Hosting Server from the Run command on both CCR Nodes.


Please let me know if anyone faced this problem before and could solve it with the same above steps, and if you could not test this on a CCR Environment, please try it now, so you will be familiar with the steps shown above.

I hope the above information is useful to you, and hope to bring again another more issues which might help you with Exchange Server 2007.

Saturday, July 21, 2007

MS Exchange Server 2007 – Active Directory Preparation

How to Prepare Active Directory for Exchange Server 2007 Installation:

As we all know, Microsoft Exchange Server 2007 uses the Active Directory directory service to store and share directory information with Microsoft Windows, so without Active Directory directory Services, you will not be able to have any version of Exchange Server 200x installed under your network. If you have already Active Directory deployed under your production network and you want to deploy Exchange Server 2007, then continue reading this article to know how to prepare Active Directory Domain Infrastructure for Exchange Server 2007 Deployment and Installation, but If you have NOT yet deployed Active Directory, stop reading this article and go and deploy Active Directory First then come here again to continue : ).
In order to be able to install and deploy MS Exchange Server 2007 under your production or testing lab environment, you need to first prepare your Active Directory for Exchange Server 2007 before doing any kind of Exchange Server 2007 installation. Here I will try to explain how to prepare the Active Directory directory service and domains for installing Microsoft Exchange Server 2007.

As I mentioned on my previous article posted previously in my blog under the name of “Microsoft Exchange Server 2007 Requirements” you have to make sure that you have met all Exchange Server 2007 Hardware, Infrastructure, and System Requirements before you proceed with Active Directory Preparation Steps mentioned on this article.
Now, here are the steps required to prepare your Active Directory for Exchange Server 2007 Deployment and Installation under you Organization:

1. Prepare Exchange Legacy Permissions

If you have Exchange Server 2003 or Exchange 2000 Server running under your Exchange Organization, then open a Command Prompt window from , and then run one of the following commands:

  • To prepare legacy Exchange permissions in every domain in the forest that contains the Exchange Enterprise Servers and Exchange Domain Servers groups, run:

    setup /PrepareLegacyExchangePermissions

  • To prepare legacy Exchange permissions in a specific domain, run

    setup /PrepareLegacyExchangePermissions:

Permission required to run these commands:

  • To run this command to prepare every domain in the forest, you must be a member of the Enterprise Admins group.

  • To run this command to prepare a specific domain, you must be a member of the Exchange Organization Administrators group and you must be a member of the Domain Admins group in the domain that you will prepare.

  • If you do not specify a domain, the domain in which you run this command must be able to contact all domains in the forest.

  • After you run this command, you must wait for the permissions to replicate across your Exchange organization before continuing to the next step. If the permissions have not replicated, the Recipient Update Service on your Exchange Server 2003 or Exchange 2000 Server computers could fail. The amount of time that replication takes depends on your Active Directory site topology.

  • To track the progress of Active Directory replication, you can use the Active Directory Replication Monitor tool (replmon.exe), which is installed as part of the Microsoft Windows Server 2003 Support Tools Setup. By default, it is located at "%programfiles%\support tools\." Add your domain controllers as monitored servers so that you can track the progress of replication throughout the domain

2. Prepare Active Directory Schema

From a Command Prompt window, run the following command:

setup /PrepareSchema

Very Important Note: You must NOT run this command in a forest in which you do not plan to run setup /PrepareAD. If you do, the forest will be configured incorrectly, and you will not be able to read some attributes on user objects. So, if you didn’t follow the steps here correctly, Don’t Blame meJ.

Permission required to run these commands:

  • This command connects to the schema master and imports LDAP Data Interchange Format (LDIF) files to update the schema with Exchange 2007 specific attributes.

  • To run this command, you must be a member of the Schema Admins group and the Enterprise Admins group.

  • You must run this command on a computer that is in the same domain and the same Active Directory site as the schema master.

  • If you have not completed Step 1, setup /PrepareSchema will perform the PrepareLegacyExchangePermissions step. To complete the PrepareLegacyExchangePermissions step, the domain in which you run this command must be able to contact all domains in the forest.

  • After you run this command, you should wait for the changes to replicate across your Exchange organization before continuing to the next step. The amount of time this takes is dependent upon your Active Directory site topology.

3. Prepare Active Directory directory Service


From a Command Prompt window, run the following command:


setup /PrepareAD [/OrganizationName: ]

What does this command do ?

  • This command configures global Exchange objects in Active Directory, creates the Exchange Universal Security Groups (USGs) in the root domain, sets permissions on the Exchange configuration objects, and prepares the current domain. The global objects reside under the Exchange organization container. If no Exchange organization container exists, you must specify an organization name by using the /OrganizationName parameter. The organization container will be created with the name that you specify.

  • This command creates the Exchange 2007 Administrative Group called Exchange Administrative Group (FYDIBOHF23SPDLT). It also creates the Exchange 2007 Routing Group called Exchange Routing Group (DWBGZMFD01QNBJR).

    Very Important Notes:

    Do not move Exchange 2007 servers out of Exchange Administrative Group (FYDIBOHF23SPDLT) and do not rename Exchange Administrative Group (FYDIBOHF23SPDLT) by using a low-level directory editor. Exchange 2007 must use this administrative group for configuration data storage. We do not support moving Exchange 2007 servers out of Exchange Administrative Group (FYDIBOHF23SPDLT) or renaming of Exchange Administrative Group (FYDIBOHF23SPDLT).

    Do not move Exchange 2007 servers out of Exchange Routing Group (DWBGZMFD01QNBJR) and do not rename Exchange Routing Group (DWBGZMFD01QNBJR) by using a low-level directory editor. Exchange 2007 must use this routing group for communication with earlier versions of Exchange . We do not support moving Exchange 2007 servers out of Exchange Routing Group (DWBGZMFD01QNBJR) or renaming of Exchange Routing Group (DWBGZMFD01QNBJR).

  • This command creates the Unified Messaging Voice Originator contact in the Microsoft Exchange System Objects container of the root domain.

  • This command prepares the local domain for Exchange 2007.
    To run this command, you must be a member of the Enterprise Admins group.

  • If you have Exchange Server 2003 servers in your organization, you must be an Exchange Full Administrator to run this command.

  • The Exchange organization name cannot contain the following characters: ~ (tilde), ` (grave accent), ! (exclamation point), @ (at sign), # (number sign), $ (dollar sign), % (percent sign), ^ (caret), & (ampersand), * (asterisk), () (parentheses), _ (underscore), + (plus sign), = (equal sign), {} (braces), [] (brackets), (vertical bar), \ (backslash), : (colon), ; (semicolon)," (quotation mark), ' (apostrophe), <> (angle brackets), , (comma), . (period), ? (question mark), / (slash mark), White spaces at the beginning or end.

  • You must run this command on a computer that is in the same domain and the same Active Directory site as the Schema Master.

  • If you have not completed Step 1, setup /PrepareAD will perform the PrepareLegacyExchangePermissions step. To complete the PrepareLegacyExchangePermissions step, the domain in which you run this command must be able to contact all domains in the forest. If you are also a member of the Schema Admins group, and if you have not completed Step 2, setup /PrepareAD will perform the PrepareSchema step.

  • After you run this command, you should wait for the changes to replicate across your Exchange organization before continuing to the next step. The amount of time this takes is dependent upon your Active Directory site topology.

To verify that this step completed successfully, make sure that there is a new organizational unit (OU) in the root domain called Microsoft Exchange Security Groups. This OU should contain the following new Exchange USGs:

  • Exchange Organization Administrators
  • Exchange Recipient Administrators
  • Exchange View-Only Administrators
  • Exchange Servers
  • ExchangeLegacyInterop

When you install Exchange 2007, Setup will add the Exchange Organization Administrators USG as a member of the local Administrators group on the computer on which you are installing Exchange. Be aware that the local Administrators group on a domain controller has different permissions than the local Administrators group on a member server. If you install Exchange 2007 on a domain controller, the users who are Exchange Organization Administrators will have additional Windows permissions that they do not have if you install Exchange 2007 on a computer that is not a domain controller.

4. Prepare other specific Domains (if exists).

From a Command Prompt window, run one of the following commands:

  • Run setup /PrepareDomain to prepare the local domain. Note that you do not need to run this in the domain where you ran Step 3. Running setup /PrepareAD prepares the local domain.

  • Run setup /PrepareDomain: to prepare a specific domain.

  • Run setup /PrepareAllDomains to prepare all domains in your organization.

These commands perform the following tasks:

  • Sets permissions on the Domain container for the Exchange Servers, Exchange Organization Administrators, Authenticated Users, and Exchange Mailbox Administrators.

  • Creates the Microsoft Exchange System Objects container if it does not exist, and sets permissions on this container for the Exchange Servers, Exchange Organization Administrators, and Authenticated Users.

  • Creates a new domain global group in the current domain called Exchange Install Domain Servers. It also adds the Exchange Install Domain Servers group to the Exchange Servers USG in the root domain.

Note the following:

  • For domains that are in an Active Directory site other than the root domain, /PrepareDomain might fail with the following messages:

    "PrepareDomain for domain has partially completed. Because of the Active Directory site configuration, you must wait at least 15 minutes for replication to occur, and run PrepareDomain for again."

    "Active Directory operation failed on . This error is not retriable. Additional information: The specified group type is invalid.Active Directory response: 00002141: SvcErr: DSID-031A0FC0, problem 5003 (WILL_NOT_PERFORM), data 0The server cannot handle directory requests."

    If you see these messages, wait for or force Active Directory replication between this domain and the root domain, and then run /PrepareDomain again.
  • To run setup /PrepareAllDomains you must be a member of the Enterprise Admins group.

  • To run setup /PrepareDomain, if the domain that you are preparing existed before you ran setup /PrepareAD, you must be a member of the Domain Admins group in the domain. If the domain that you are preparing was created after you ran setup /PrepareAD, you must be a member of the Exchange Organization Administrators group, and you must be a member of the Domain Admins group in the domain.

To verify that this step completed successfully, confirm the following:

  • You have a new global group in the Microsoft Exchange System Objects container called Exchange Install Domain Servers. To view the Microsoft Exchange System Objects container in Active Directory Users and Computers, on the View menu, click Advanced Features. The Exchange Install Domain Servers group is used if you install Exchange 2007 in a child domain that is an Active Directory site other than the root domain. The creation of this group allows you to avoid installation errors if group memberships have not replicated to the child domain.

  • The Exchange Install Domain Servers group is a member of the Exchange Servers USG in the root domain.

  • On each domain controller in a domain in which you will install Exchange 2007, the Exchange Servers USG has permissions on the Domain Controller Security Policy\Local Policies\User Rights Assignment\Manage Auditing and Security Log policy.

Friday, July 20, 2007

Microsoft Exchange Server 2007 Requirements

Hardware Requirements

Microsoft maintains a list of minimum hardware requirements to install Exchange Server 2007. Microsoft recommends the following minimum hardware requirements for Exchange Server 2007:

Processor:

  • Intel Extended Memory 64 Technology (Intel EM64T). or
  • AMD Opteron or AMD Athlon 64 processor, which supports AMD64 platform.

Memory:

  • 2GB of RAM per server plus 5MB per user minimum.

Disk space:

  • At least 1.2GB on the hard disk where Exchange Server 2007 will be installed.
  • 200MB on the system drive

Paging file size:

  • Page File Size should be equal to the amount of RAM in the Server plus 10 MB.

Note:

  • That Inter Itanium IA64 Processors are NOT SUPPORTED.
  • These hardware requirements from Microsoft are the bare minimum and should not be used in best-practice scenarios. In addition, hardware requirements can change because of features and functionality required by the company, for example, the implementation of Unified Messaging voice mail services or clustering on an Exchange 2007 server can require more memory
Infrastructure Requirements for Exchange Server 2007

Exchange Server 2007 has the following infrastructure requirements:

  • The Schema Master Domain Controller must have Windows Server 2003 SP 1 or Windows Server 2003 R2 Installed.
  • Global Catalog Server used by Exchange Server 2007 must be running Windows Server 2003 SP 1 or Windows Server 2003 R2 Installed.
  • Active Directory Domain Functional Level must be Windows 2000 Native or higher for all domains in the Active Directory Forest where you will install Exchange Server 2007 or have mailbox-enabled users.
  • Forest Functional Level must be Windows Server 2003 Functional Level.
  • No Microsoft Exchange Server 5.5 Servers should be in the Exchange Organization and the Exchange Organization must be in Native Mode.
  • Domain Name System (DNS) is configured correctly in the Active Directory Forest.
  • Active Directory is prepared for the Exchange Server 2007.
  • WINS is not required anymore for Exchange Server 2007 Installation, operation and management.

Exchange Server 2007 System Requirements

Exchange 2007 has the following requirements for Installation:

  • Windows Server 2003 – 64-Bit (or Windows Server 2003 R2 – 64-Bit) as Operating System.
  • .Net Framework 2.0
  • Microsoft Management Console (MMC) v 3.0
  • Microsoft PowerShell v 1.0.
  • Windows Security Updates.
For each and every Exchange Server 2007 which will be deployed under the Production network, all the above software and updates must be installed prior to install Exchange Server 2007. You will not be able to proceed with Exchange Server 2007 Installation on any server if one of the system requirements was not installed on the server.